The ground shakes to the tread of marching feet and the growl of engines as armies advance across the battlefield and vie for advantageous positions.
Your Movement phase is split into two steps. First you can move your units, then you can set up reinforcements.
Start your Movement phase by selecting one unit from your army that is on the battlefield to move:
■ Unless that unit is within Engagement Range of any enemy models, it can make a Normal move, or Advance, or Remain Stationary. ■ If that unit is within Engagement Range of any enemy models, it can either Remain Stationary or Fall Back.
After you have finished moving that unit, select another unit from your army to move, and so on, until you have done so with all of your units. Once you have moved all of your units, progress to the Reinforcements step of your Movement phase.
Each time you move a unit, you can move any of its models you choose to. The controlling player chooses the order in which to move their models. Each time you move a model (other than when a model Remains Stationary, see below), you can move it across the battlefield in any combination of straight lines and pivots (see below). While you are moving it, no part of its base can be moved through an enemy model or cross the edge of the battlefield. It can be moved through friendly models, but it cannot end its move on top of another model. The only exception to this is when moving MONSTER or VEHICLE models; such models cannot be moved through other friendly MONSTER or VEHICLE models and must be moved around them instead. While a model (excluding VEHICLE models that do not have the WALKER keyword) is moving in a straight line, it can be moved through any space its base can fit through, but it cannot end its move somewhere the model cannot be placed.
Units that are within Engagement Range of any enemy models can only Fall Back or Remain Stationary.
When a unit moves it can make a Normal move, Advance or Remain Stationary.
’Surge’ Moves
Some rules enable units to make out-of-phase ‘surge’ moves when a certain trigger occurs (e.g. Khorne Berzerkers’ Blood Surge ability, triggered after one or more of their models are destroyed by enemy ranged attacks). Unless otherwise stated, the following restrictions apply to all such moves:
■ Each unit can only make one ‘surge’ move per phase. ■ A unit cannot make a ‘surge’ move while it is Battle-shocked. ■ A unit cannot make a ‘surge’ move while it is within Engagement Range of one or more enemy units.
Straight Lines
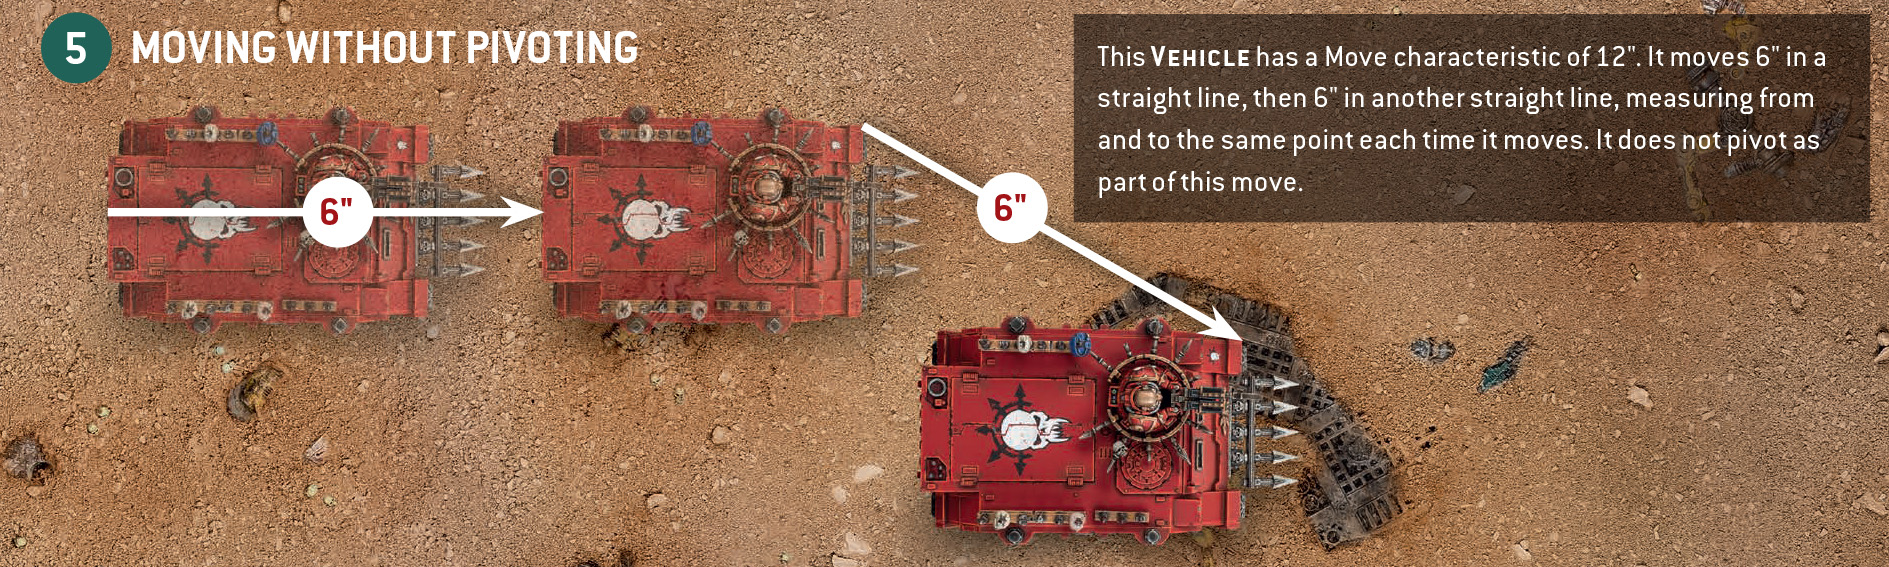
Each time you move a model in a straight line, measure the distance from the same point on its base at the start and end of that line. For example, you can measure from the ‘back’ of the model’s base, and measure the distance to the back of the model’s base at the end of that line. If a model does not have a base, measure using the same point on the model at the start and end of that line.
Pivots
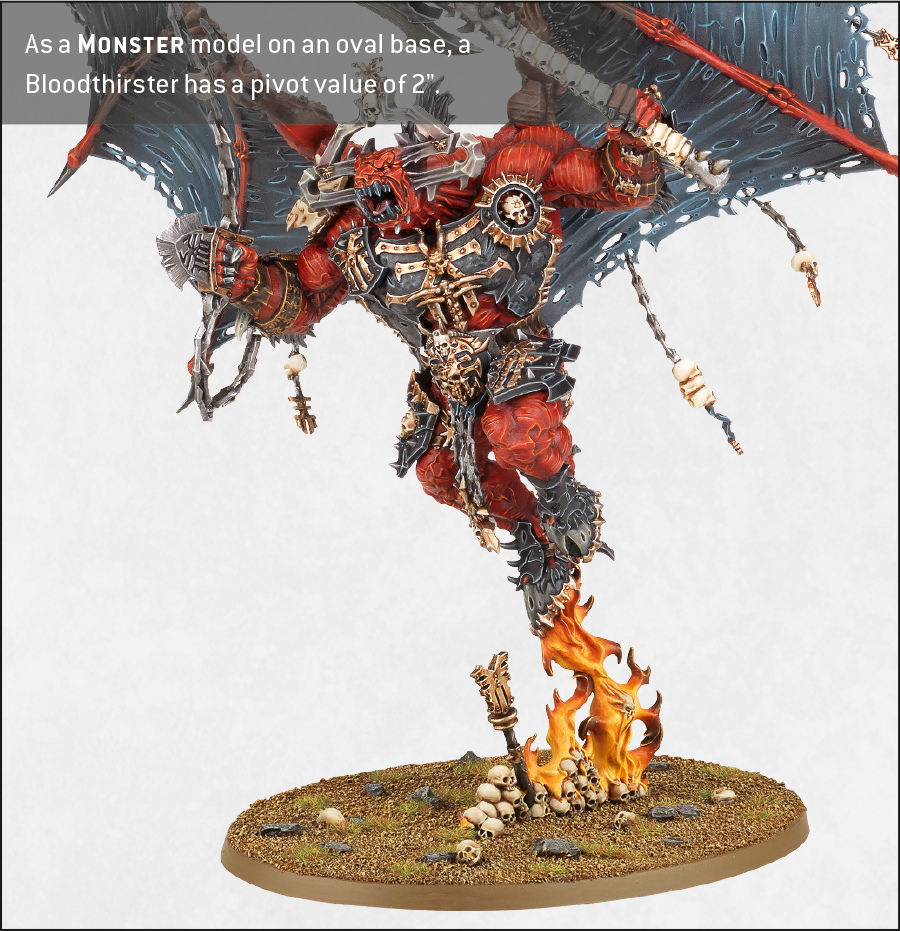
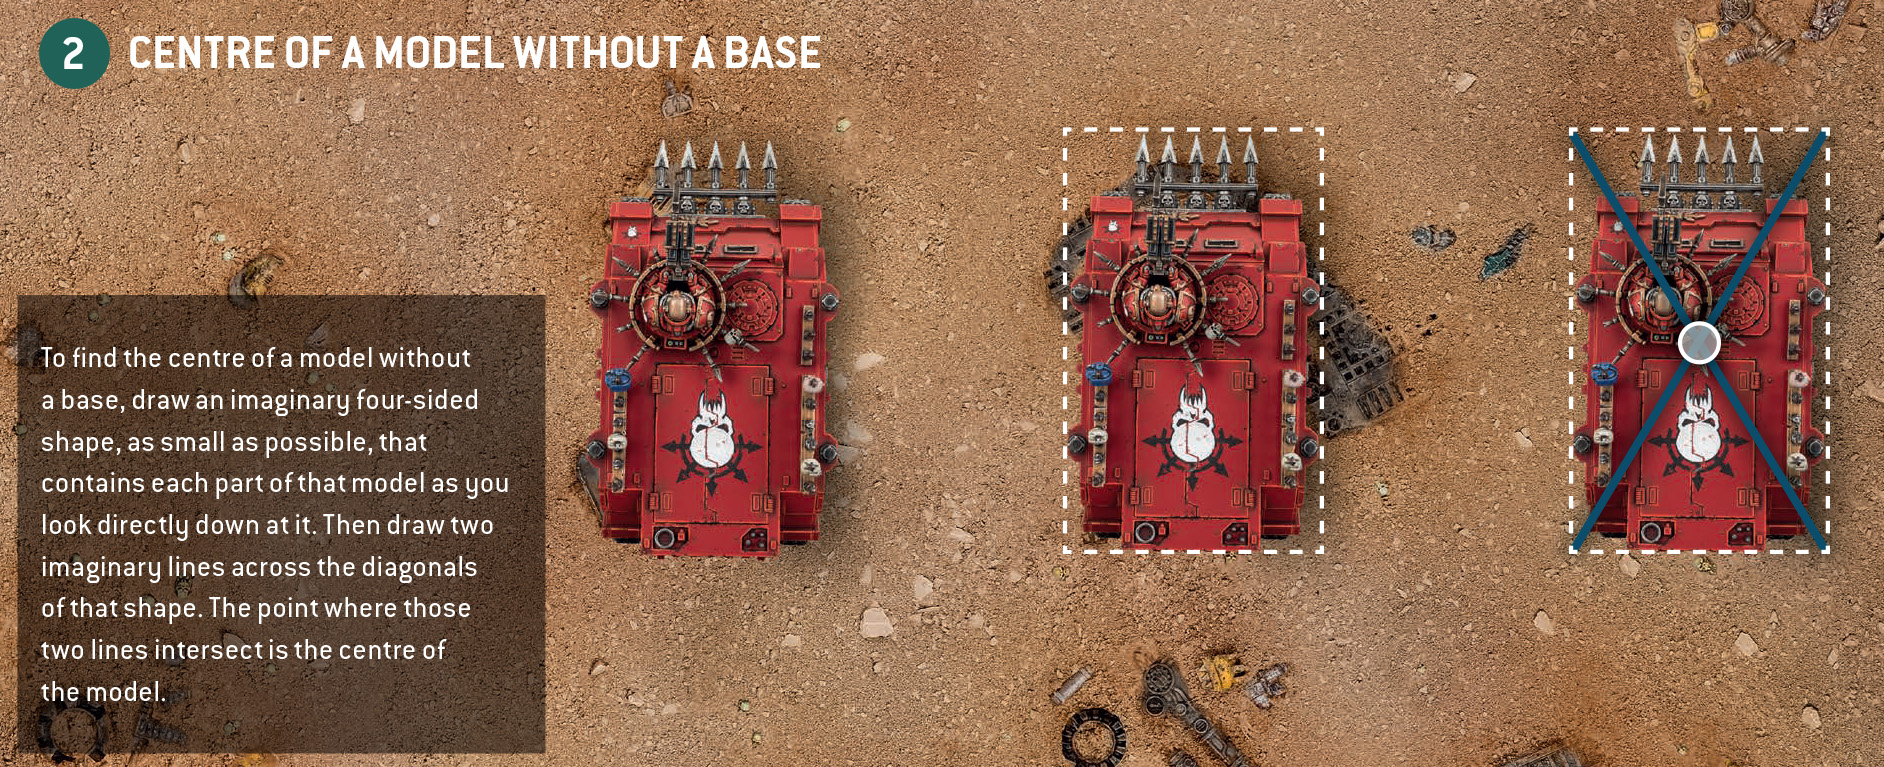
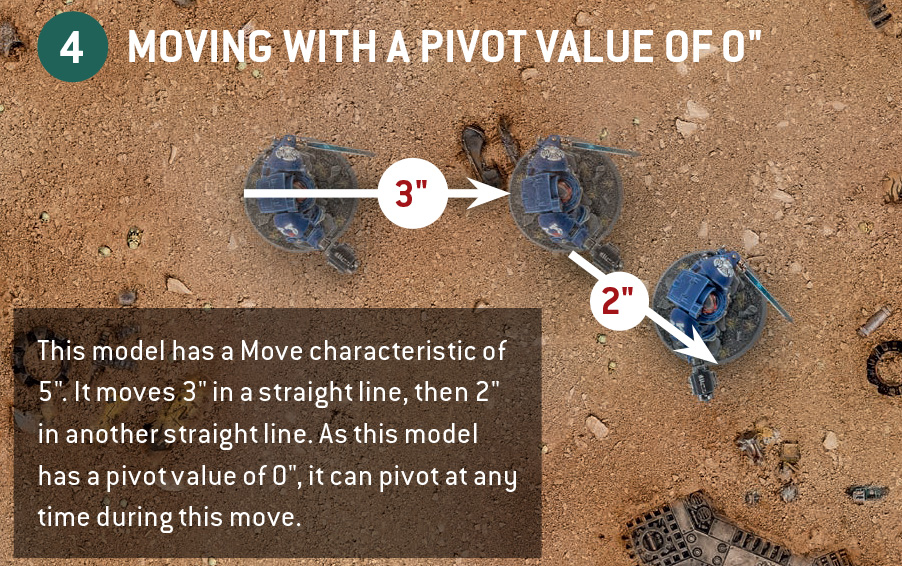
Each time you pivot a model, rotate it any amount around its central axis (perpendicular to the battlefield through the centre of its base, or through the centre of the model if it doesn’t have a base). The first time you do this during each model’s move, subtract that model’s pivot value (see below) from the remaining distance it can move during that move. If there is not enough distance left to do this, it cannot pivot. Note that the distance it can move is only reduced once for that move, regardless of how many additional times it pivots during that move.
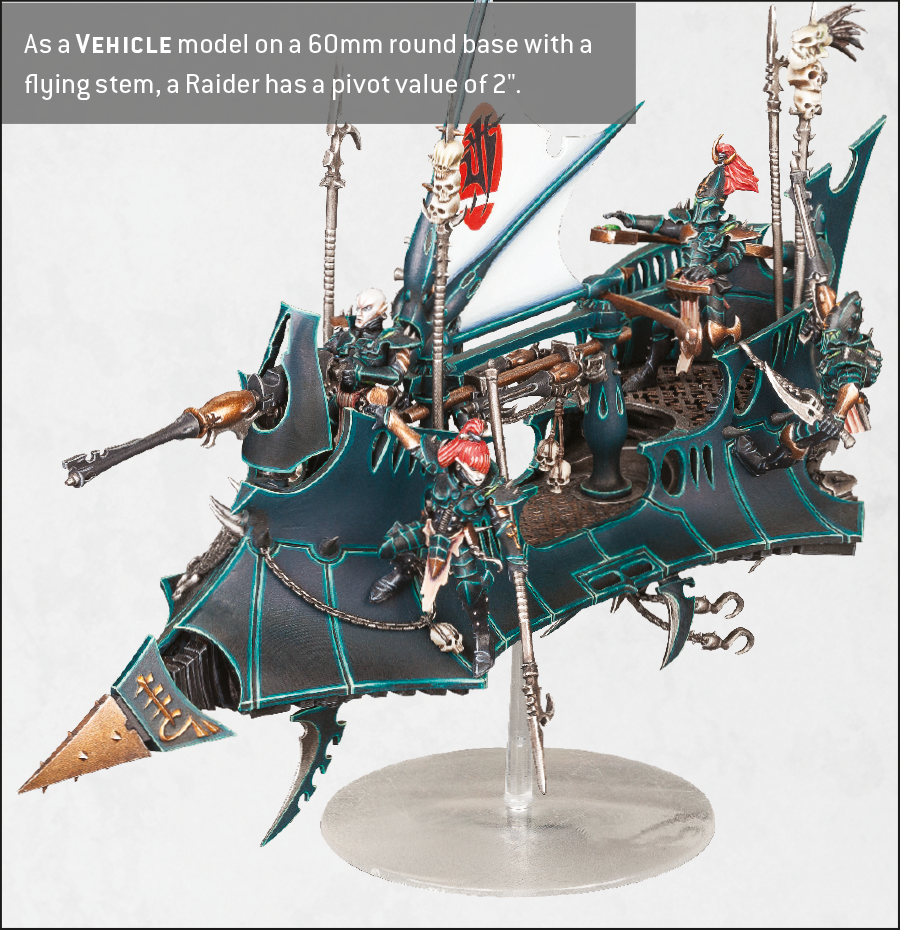
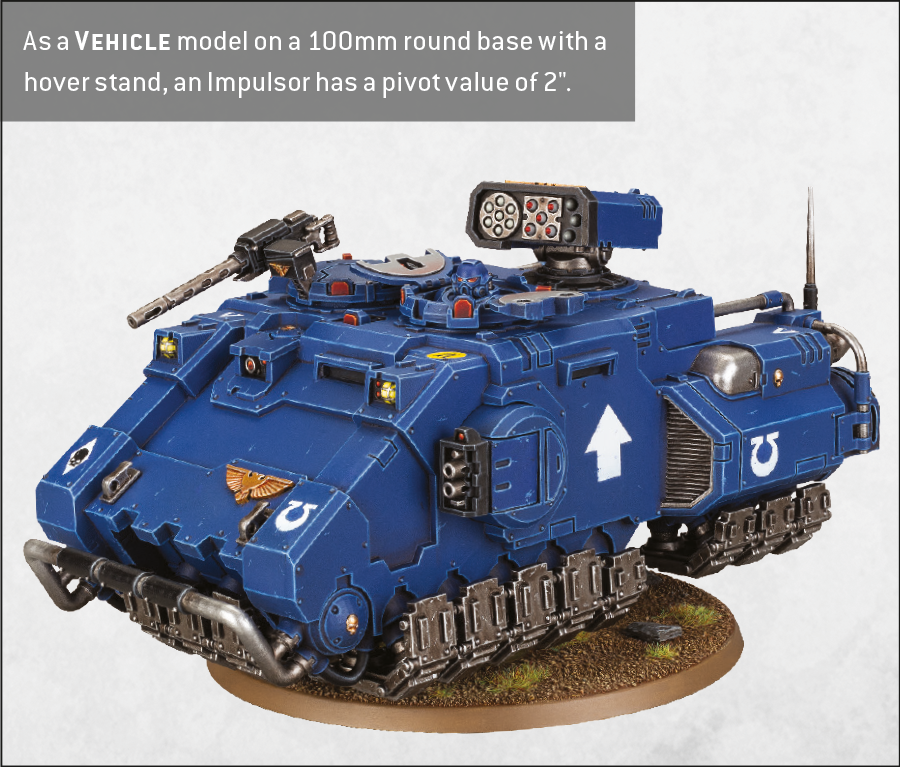
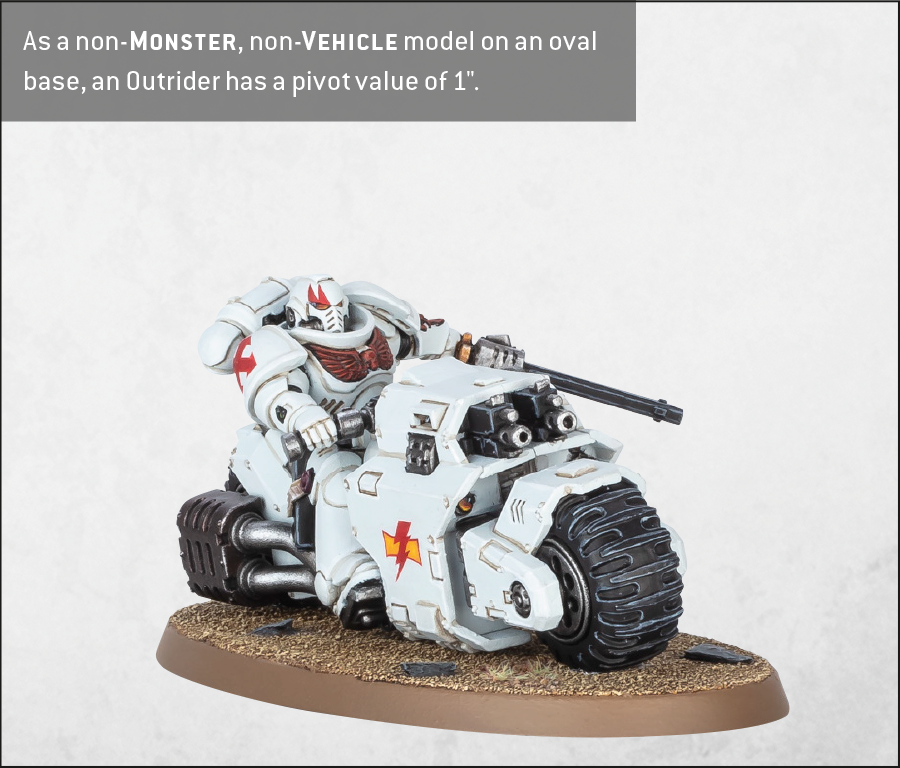
Pivot Values
Unless otherwise stated, the following pivot values apply.
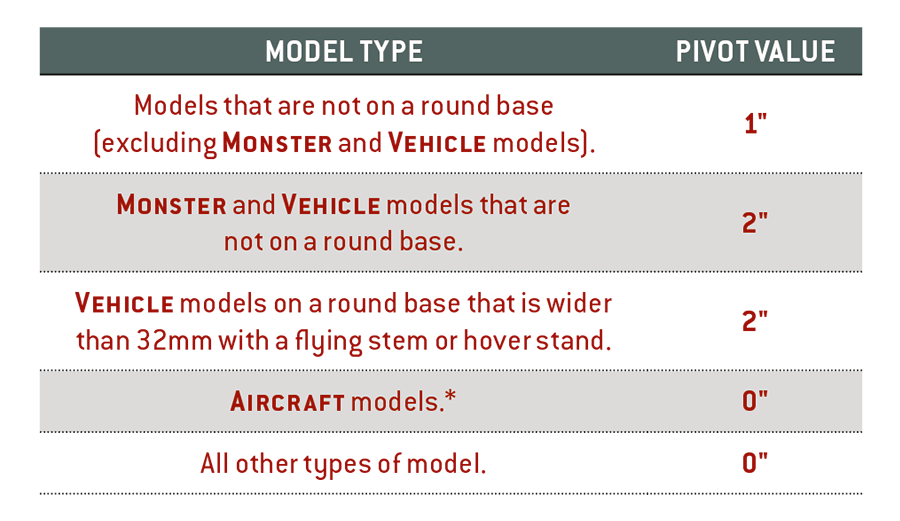
*Note that AIRCRAFT models have separate rules for pivoting, as described in the Aircraft Section of the Further Rules.


- Moving With Multiple Pivots
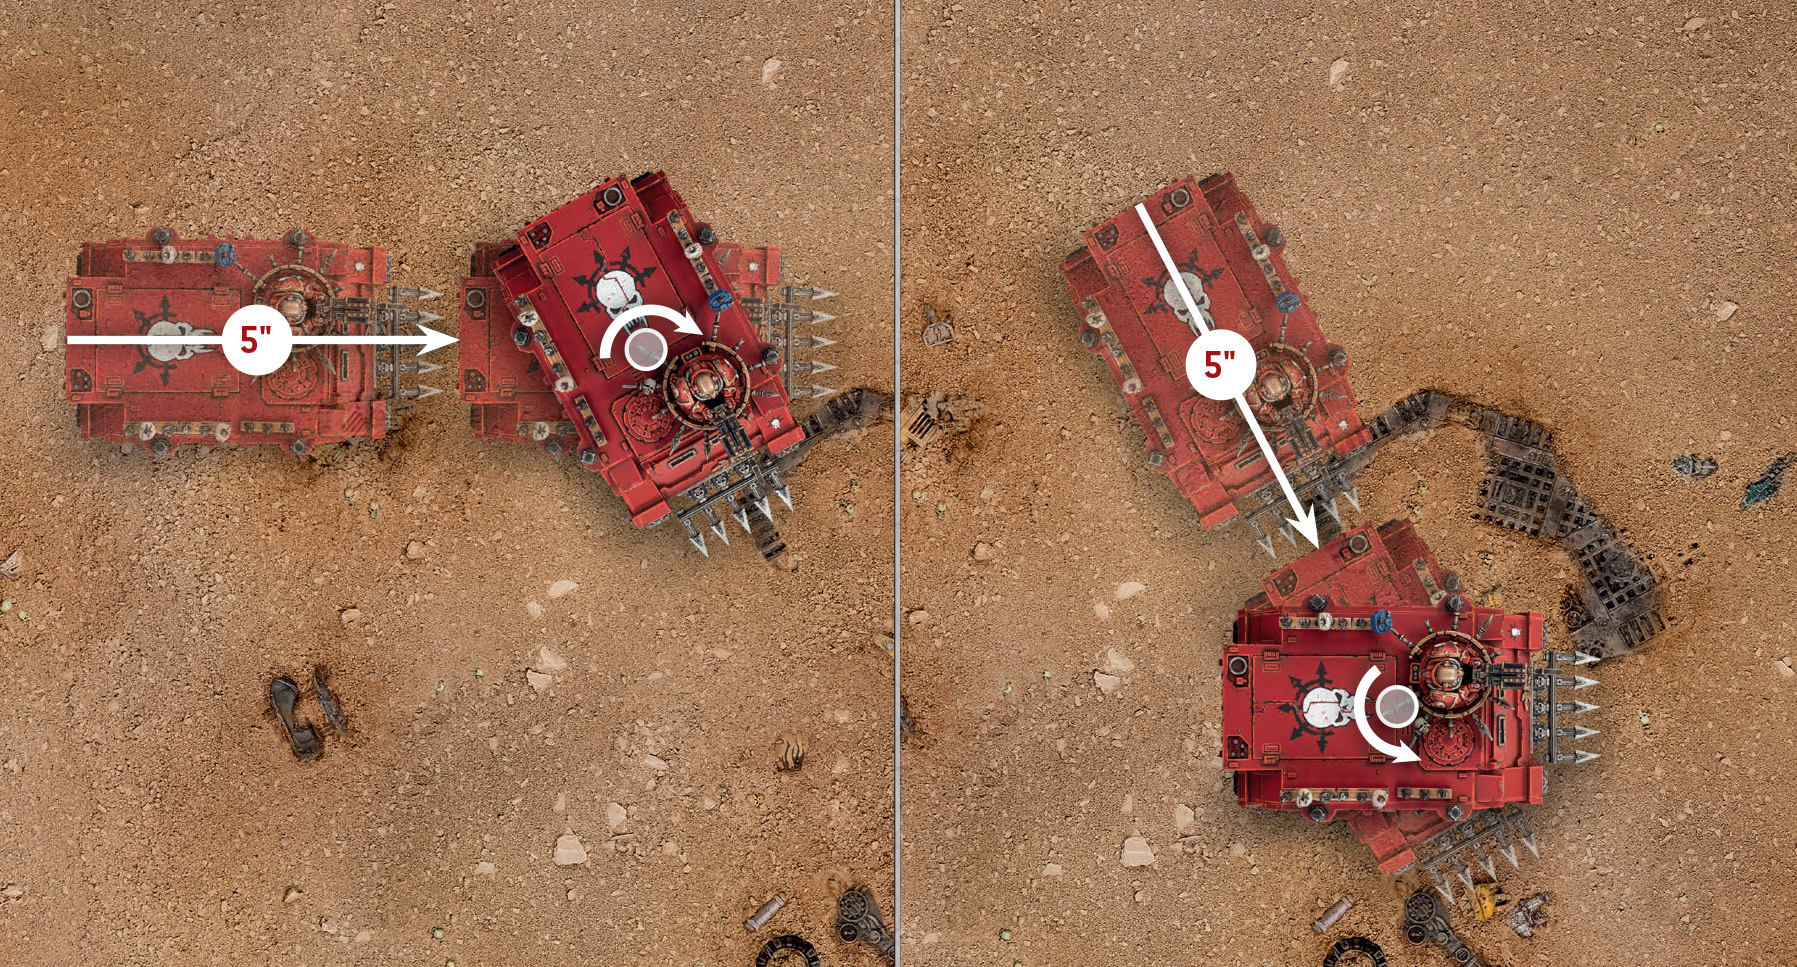
The same VEHICLE pivots more than once during its move, but the total distance it can move is still only reduced by its pivot value of 2". It moves 5"in a straight line, pivoting around its central axis, then 5"in another straight line, pivoting around its central axis again.
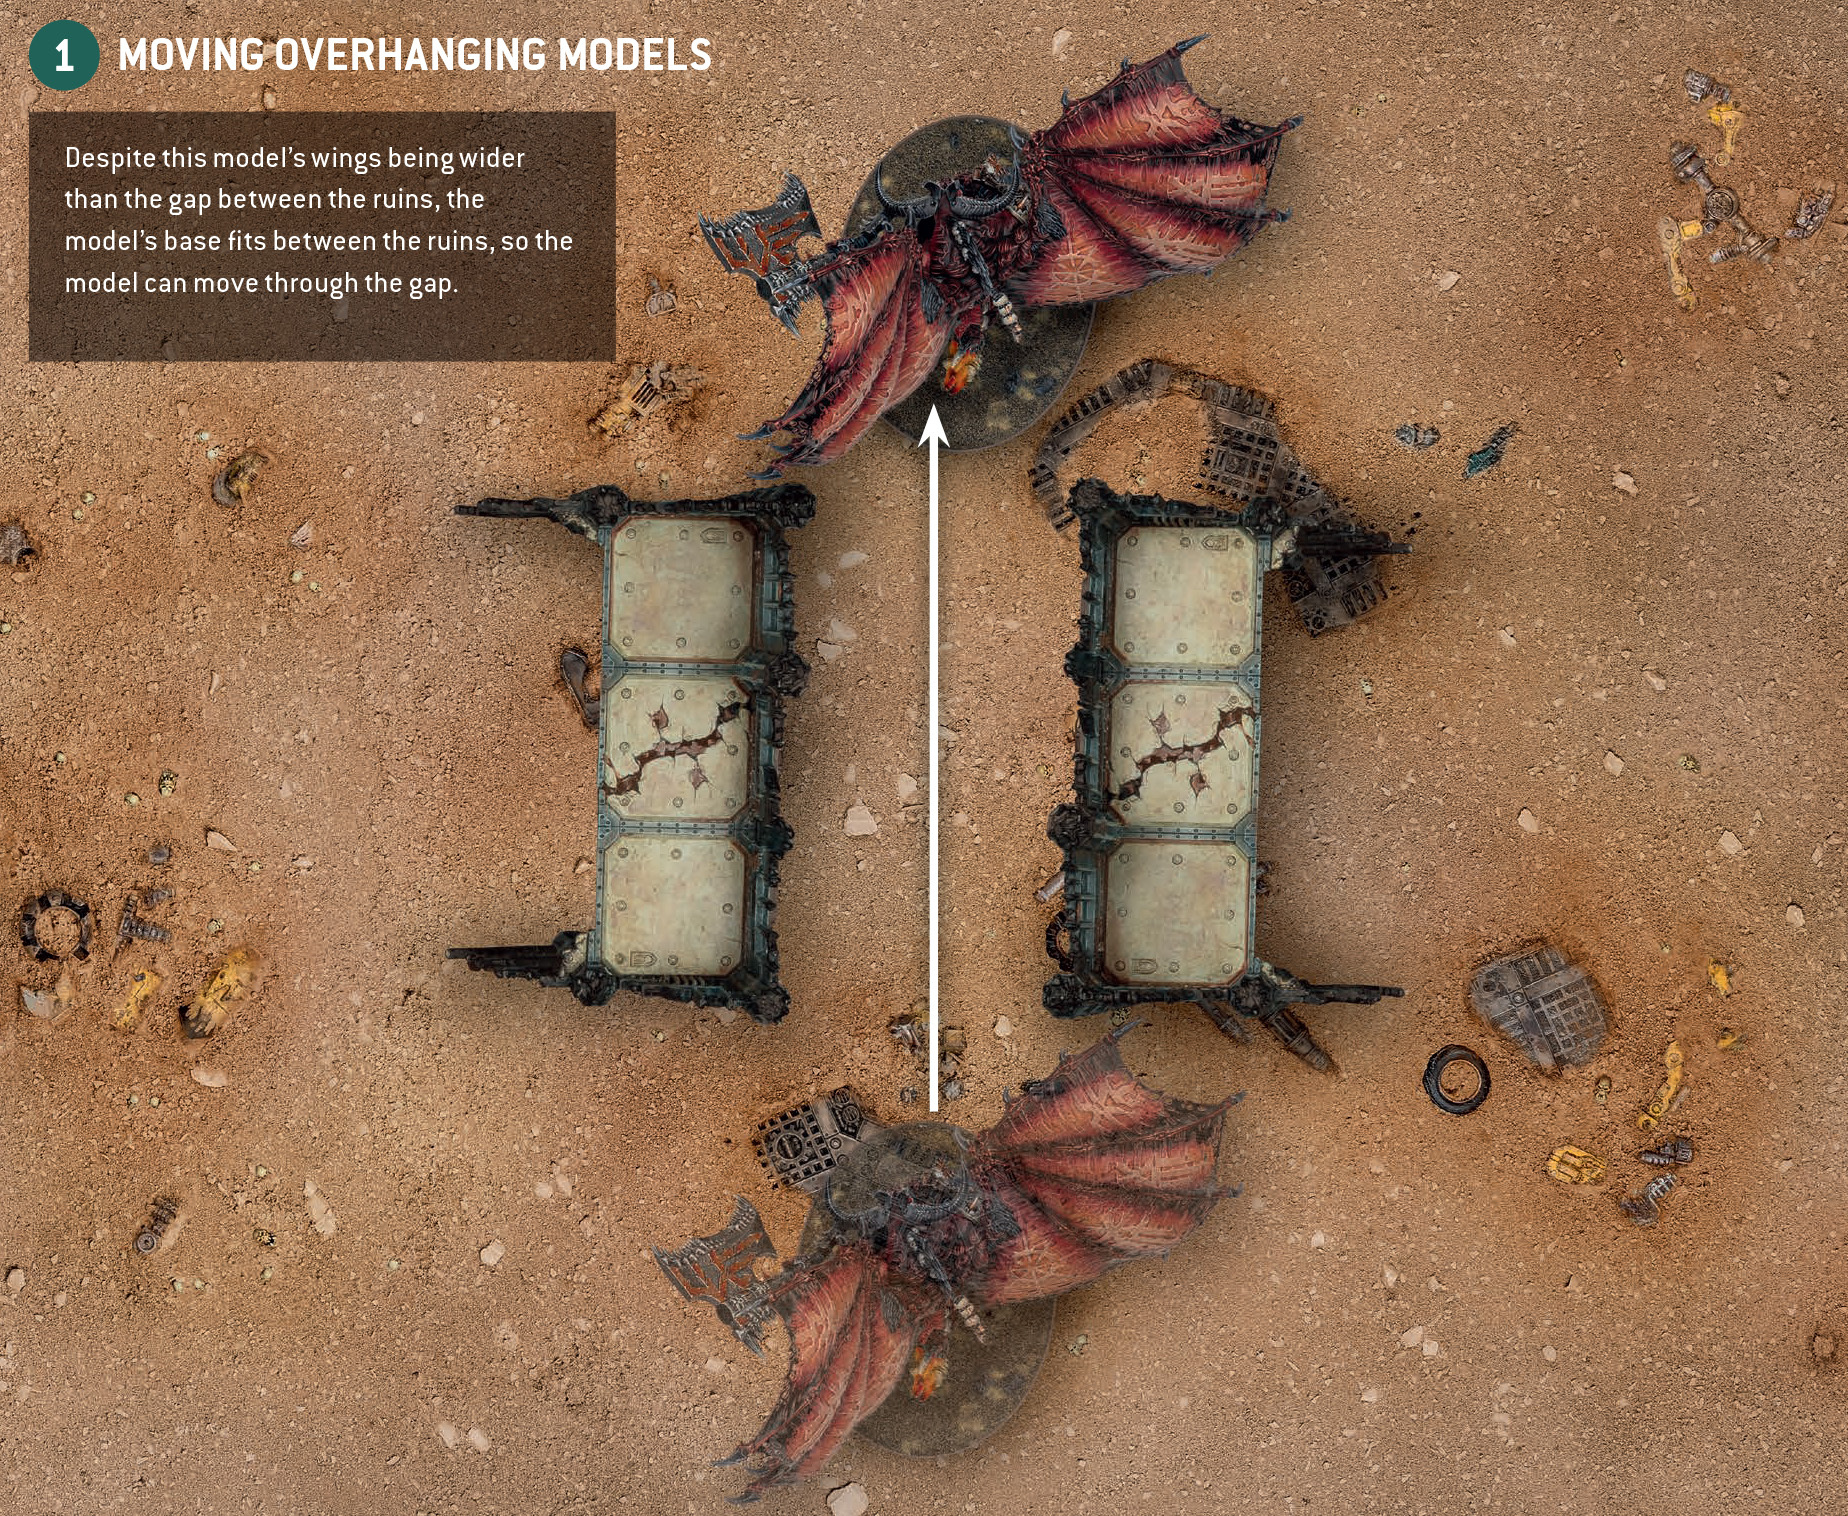
- Moving Overhanging Models With A Pivot Value Of 2"
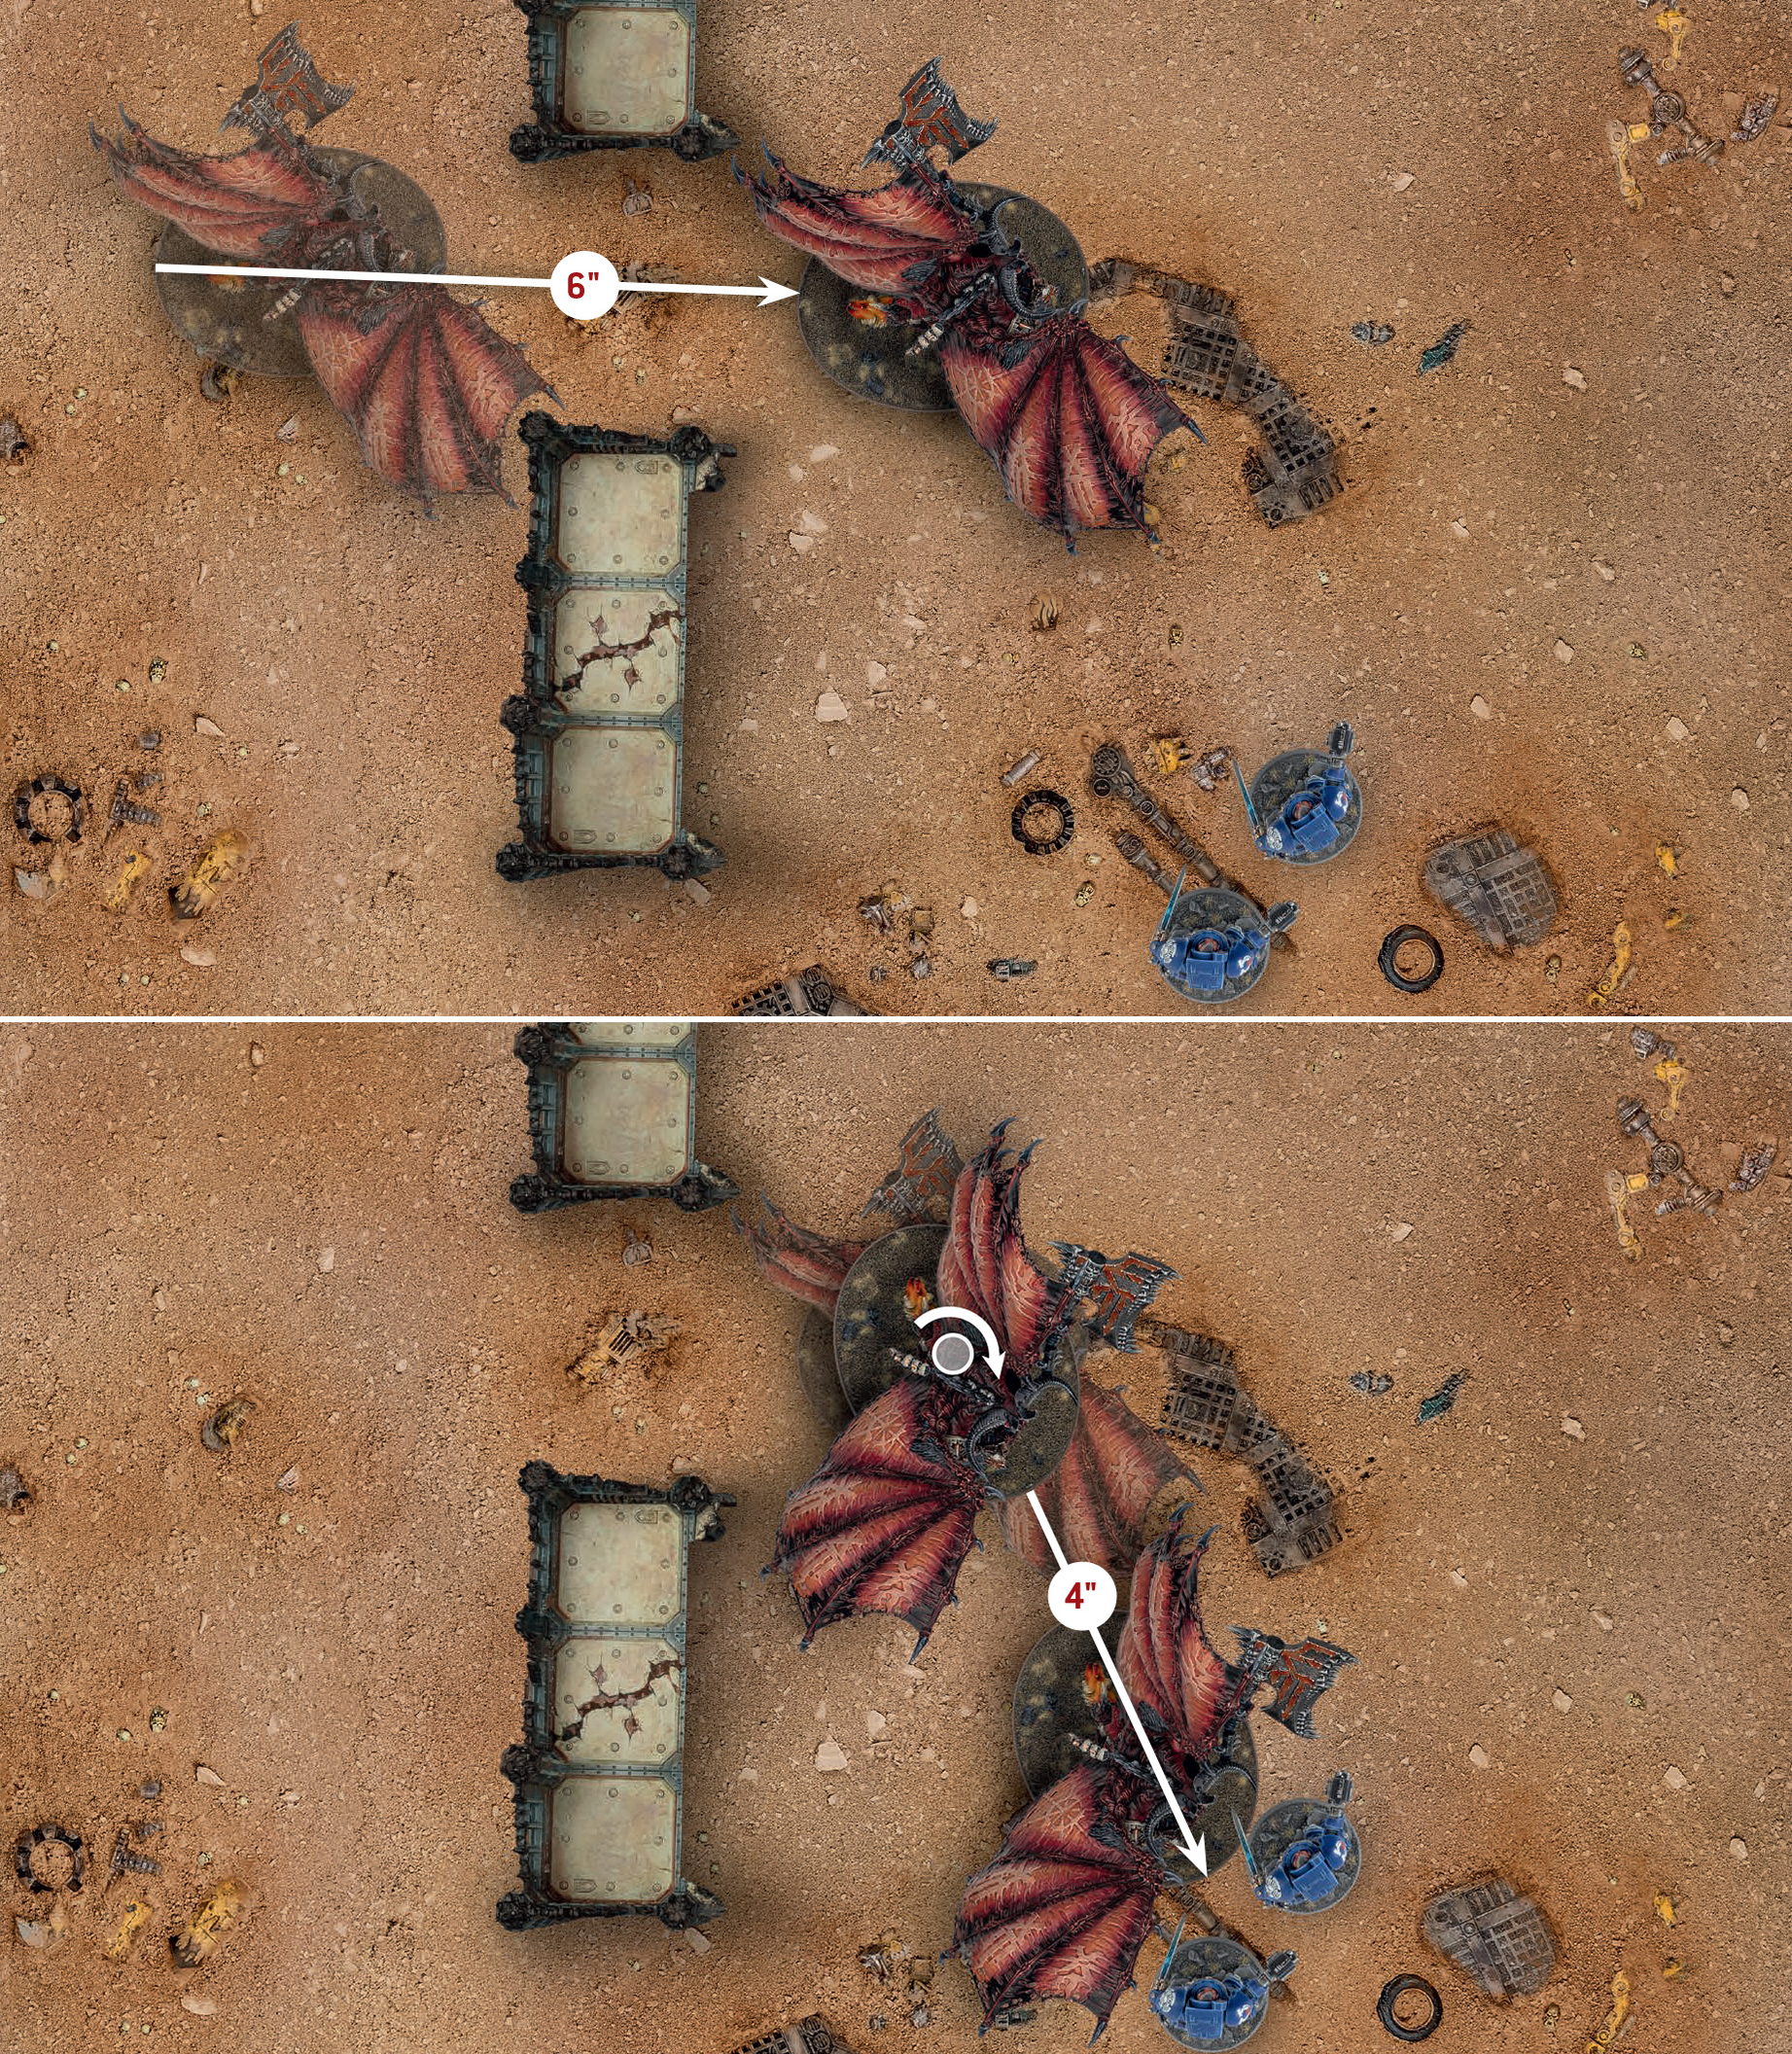
This Bloodthirster has declared a charge targeting the Terminator Squad. Its Charge roll is 12". The gap in the ruins is wide enough for the model’s base, so it can move through that gap despite its wings. It moves 6"in a straight line, then pivots around its central axis, subtracting its pivot value of 2"from the Charge roll, then moves 4"in a straight line to complete its Charge move.
Remain Stationary
If a unit Remains Stationary, none of its models can be moved for the rest of the phase.
Normal Moves
When a unit makes a Normal move, each model in that unit can move a distance in inches less than or equal to its Move (M) characteristic, but no model can be moved within Engagement Range of any enemy models (see Armies section). A unit cannot make more than one Normal move per phase.
Cannot move within Engagement Range of any enemy models.
Normal Move: Models move up to M".
Advance Moves
When a unit Advances, make an Advance roll for that unit by rolling one D6. Add the result in inches to the Move characteristic of each model in that unit until the end of the phase. Each model in that unit can then make an Advance move by moving a distance in inches less than or equal to this total, but no model can be moved within Engagement Range of enemy models. A unit cannot shoot or declare a charge in the same turn that it Advanced.
Units that Advance cannot shoot or charge this turn.
Cannot move within Engagement Range of any enemy models.
Advance Move: Models move up to M+D6".
When a unit Falls Back, each model in that unit can make a Fall Back move by moving a distance in inches less than or equal to its Move characteristic, and when doing so you can move it within Engagement Range of enemy models, provided it does not end that move within Engagement Range of any enemy models – if this is not possible, that unit cannot Fall Back.
A unit cannot shoot or declare a charge in the same turn that it Fell Back.
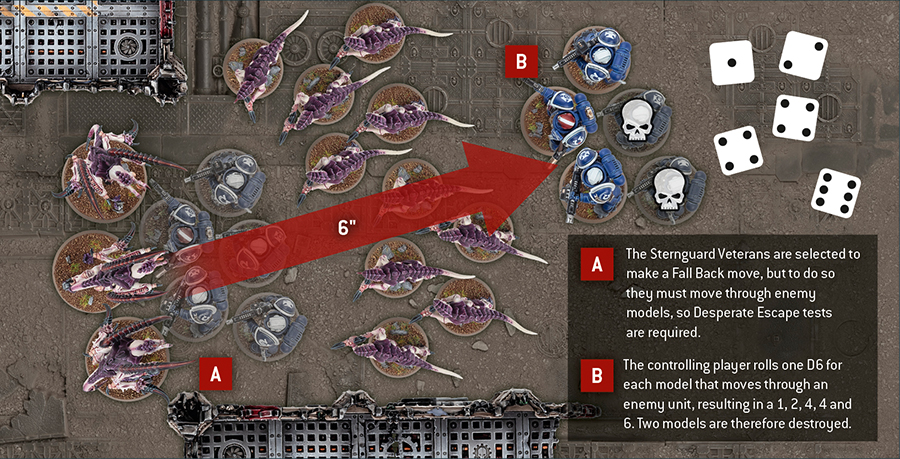
Desperate Escape Tests
Unlike when making other types of move, models can move over enemy models when making a Fall Back move as if those enemy models were not there, but you must take a Desperate Escape test for each model that will do so (excluding models that are TITANIC or can FLY) before any models in that unit are moved. In addition, if a unit is Battle-shocked when it is selected to Fall Back, you must take a Desperate Escape test for every model in that unit before any are moved.
Each time you take a Desperate Escape test for a model, roll one D6. For each roll of 1-2, one model from the unit that is Falling Back is destroyed (selected by you). The same model can only ever trigger one Desperate Escape test per phase.
If a Battle-shocked unit is selected to Fall Back, take a Desperate Escape test for every model in that unit.
Desperate Escape Test: Roll one D6. On a 1-2, one model from that unit is destroyed.
Units that Fall Back cannot shoot or declare a charge in the same turn.
Fall Back Move: Models move up to M".
Models can move over enemy models when Falling Back, but you must take Desperate Escape tests for them before they do so (excluding models that are TITANIC or can FLY).
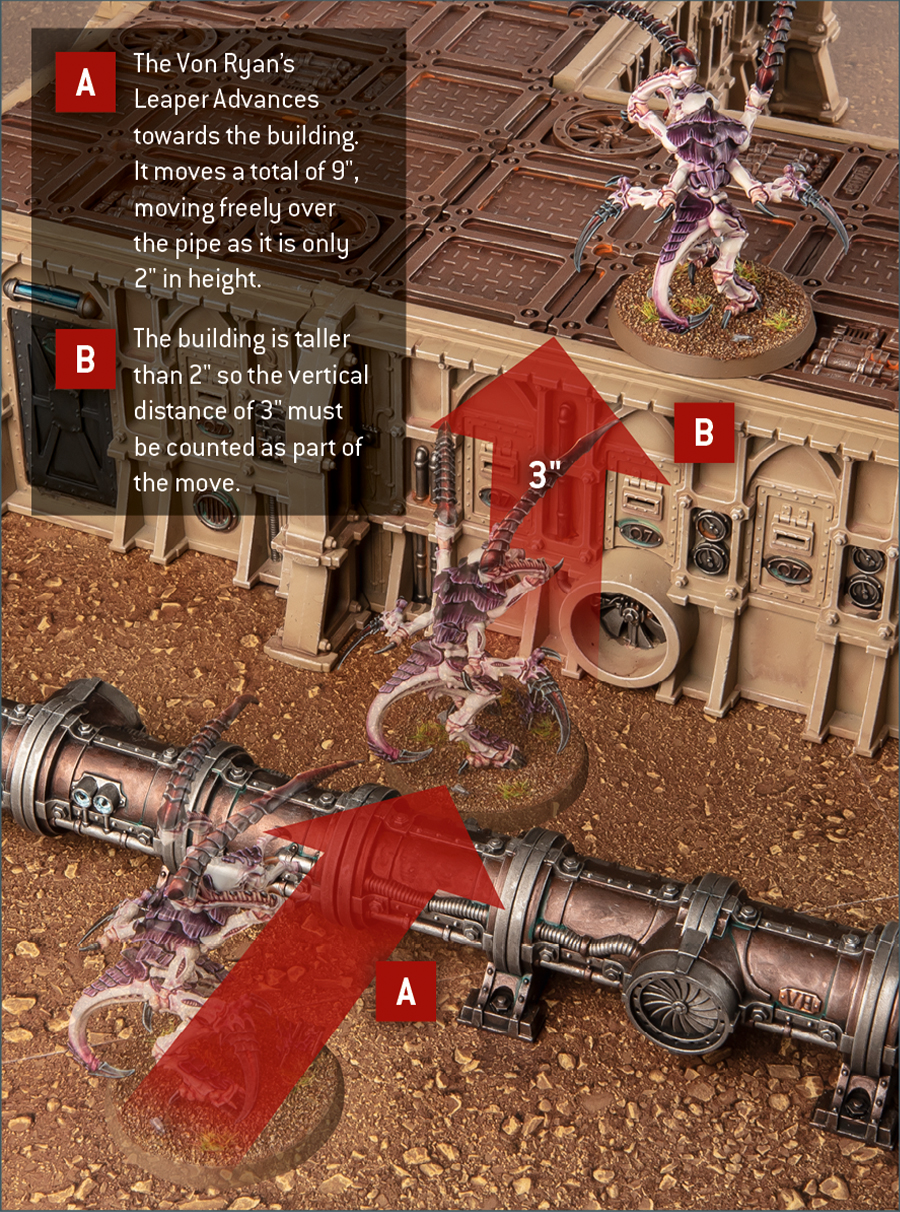
Warhammer 40,000 battlefields are strewn with a wide variety of obstacles, structures and detritus collectively known as terrain features (see Terrain Features section). When a model makes any kind of move, it can be moved over a terrain feature but not through it (so models can’t move through a wall, for example, but can climb up or over it). A model can be moved over terrain features that are 2"or less in height as if they were not there.
A model can be moved vertically in order to climb up or down any terrain features that are taller than this, counting the vertical distance up and/or down as part of its move. Models cannot end any kind of move mid-climb – if it is not possible to end the move as a result, that move cannot be made.
Models cannot move through terrain features taller than 2",but can climb up and down them.
Models can move freely over terrain features 2"or less in height
If a model can FLY, then when it makes a Normal, Advance or Fall Back move, it can be moved over enemy models as if they were not there, and can be moved within Engagement Range of enemy models when making such a move. Note this also means that MONSTER and VEHICLE models that can FLY can be moved over other MONSTER and VEHICLE models when making such a move. However, models that can FLY cannot end their move on top of any other models or within Engagement Range of any enemy models.
When a model that can FLY starts or ends a move on a terrain feature, instead of measuring the path it has moved across the battlefield, you instead measure its path ‘through the air’, as shown in the diagram below.
FLY models that start or end a move on a terrain feature measure distance moved through the air when they make a Normal, Advance or Fall Back move.
FLY models can move over enemy models when they make a Normal, Advance or Fall Back move.

Some units have a rule that allows them to start the battle in Reserves, such as Deep Strike (see Deployment Abilities section). Such units will arrive later in the battle and are known as Reserves units. Any Reserves units that have not been set up on the battlefield when the battle ends count as having been destroyed.
In the Reinforcements step of your Movement phase, if you have any Reserves units in your army, you can select one or more of them and set them up on the battlefield, one at a time. Once all your Reserves units that you wish to set up this turn have been set up, your Movement phase ends and you progress to your Shooting phase.
Details of how to set up Reserves units are described in the same rules that enabled the unit to be set up in Reserves. These rules will typically specify a distance away from all enemy models; whenever such a distance is specified, it always applies to the horizontal distance, even though normally you measure to and from the closest part of a model’s base.
Reserves units always count as having made a Normal move in the turn they are set up on the battlefield, and so cannot move further during this phase. Otherwise, units set up in this way can act normally this turn (shoot, declare a charge, fight, etc.).
Always count as having made a Normal move in the turn they are set up on the battlefield
Any specified distance from enemy models applies to horizontal distance.
Any Reserves unit not set up on the battlefield by the end of the battle counts as destroyed.
Reserves Unit: A unit that starts the battle in a location other than the battlefield.
Some units can carry others across the battlefield, providing their passengers with greater speed and protection as they are ferried to the front lines or towards vital objectives.
Some models have the TRANSPORT keyword. The following rules describe how units can embark within and disembark from such models, and how they are used to move these passengers across the battlefield.
Transport Capacity
All TRANSPORT models have a transport capacity listed on their datasheet. This determines the type and maximum number of friendly models that can embark within them.
Units can start the battle embarked within a TRANSPORT model instead of being set up separately – declare which units are embarked within a TRANSPORT model before you set it up.
Embark
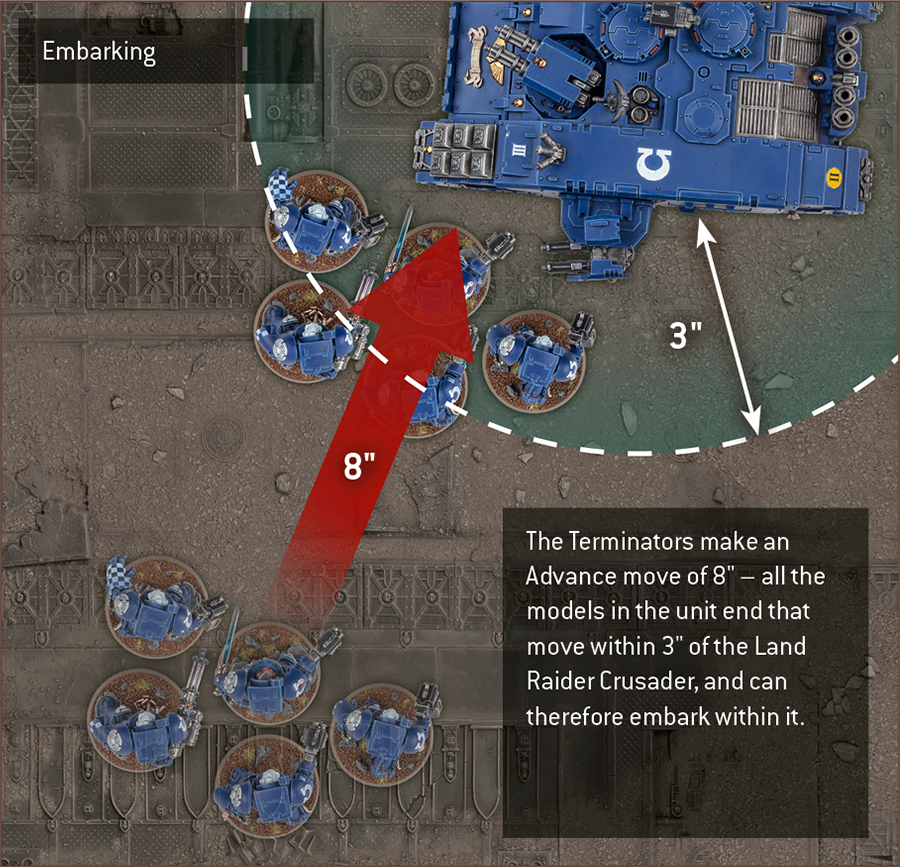
If a unit makes a Normal, Advance or Fall Back move, and every model in that unit ends that move within 3"of a friendly TRANSPORT model, they can embark within it. A unit cannot embark if it has already disembarked from a TRANSPORT model in the same phase. Remove the unit from the battlefield and place it to one side – it is now embarked within that TRANSPORT model. Unless otherwise stated, units cannot do anything or be affected in any way while they are embarked.
A unit can embark within a friendly TRANSPORT if all of its models end a Normal, Advance or Fall Back move within 3"of that TRANSPORT.
A unit cannot embark and disembark in the same phase.
Disembark
If a unit from your army starts your Movement phase embarked within a TRANSPORT model, that unit can disembark in that phase.
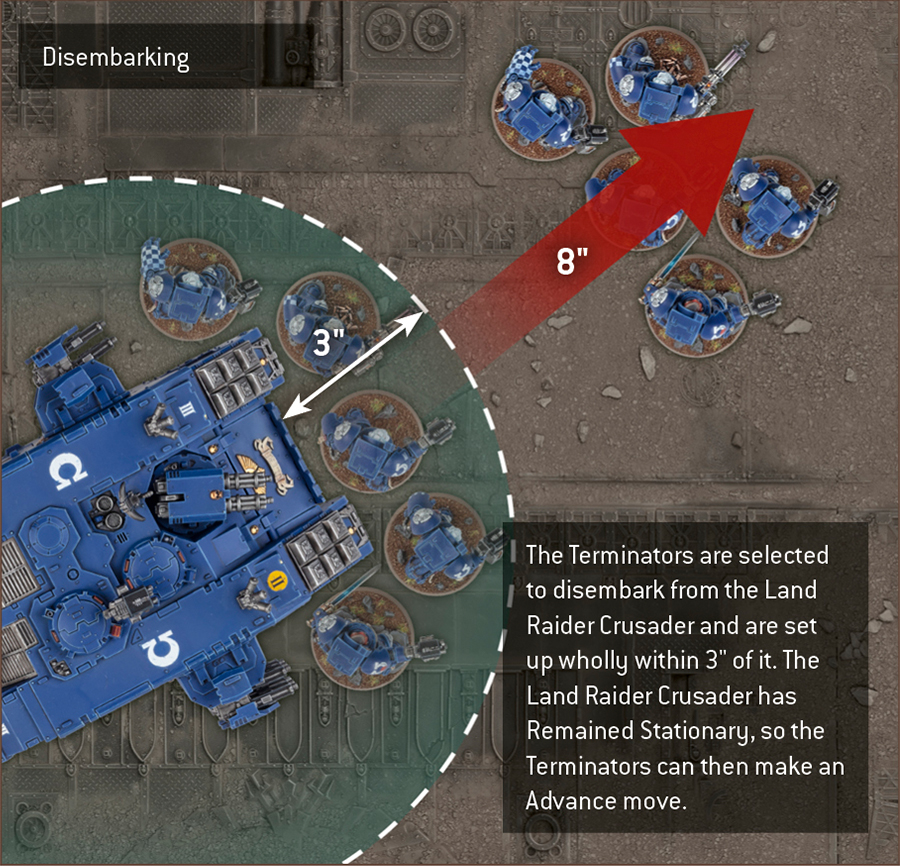
When a unit disembarks from a TRANSPORT model, set it up on the battlefield so that it is wholly within 3"of that TRANSPORT model and not within Engagement Range of any enemy models. If, for any reason, a disembarking model cannot be set up, that model’s unit cannot disembark.
Units that disembark from a TRANSPORT model that either Remained Stationary this phase or has not yet made a Normal, Advance or Fall Back move this phase can then act normally (make a Normal move, Advance, shoot, declare a charge, fight, etc.) in the remainder of the turn. Such a disembarking unit cannot choose to Remain Stationary.
Units that disembark from a TRANSPORT model that made a Normal move this phase count as having made a Normal move themselves; they cannot move further during this phase. Such a unit also cannot declare a charge in the same turn, but can otherwise act normally in the remainder of the turn.
Units cannot disembark from a TRANSPORT model that either Advanced or Fell Back this turn.
Disembarking units must be set up wholly within 3"of their TRANSPORT and not within Engagement Range of any enemy models (or the unit cannot disembark).
Units that disembark this turn cannot Remain Stationary.
Units that start your Movement phase embarked within a TRANSPORT can disembark this phase, provided their TRANSPORT has not Advanced or Fallen Back.
If a unit disembarks after its TRANSPORT moves, it cannot move or charge this turn, but can otherwise act normally.
If a unit disembarks before its TRANSPORT moves, it can act normally.
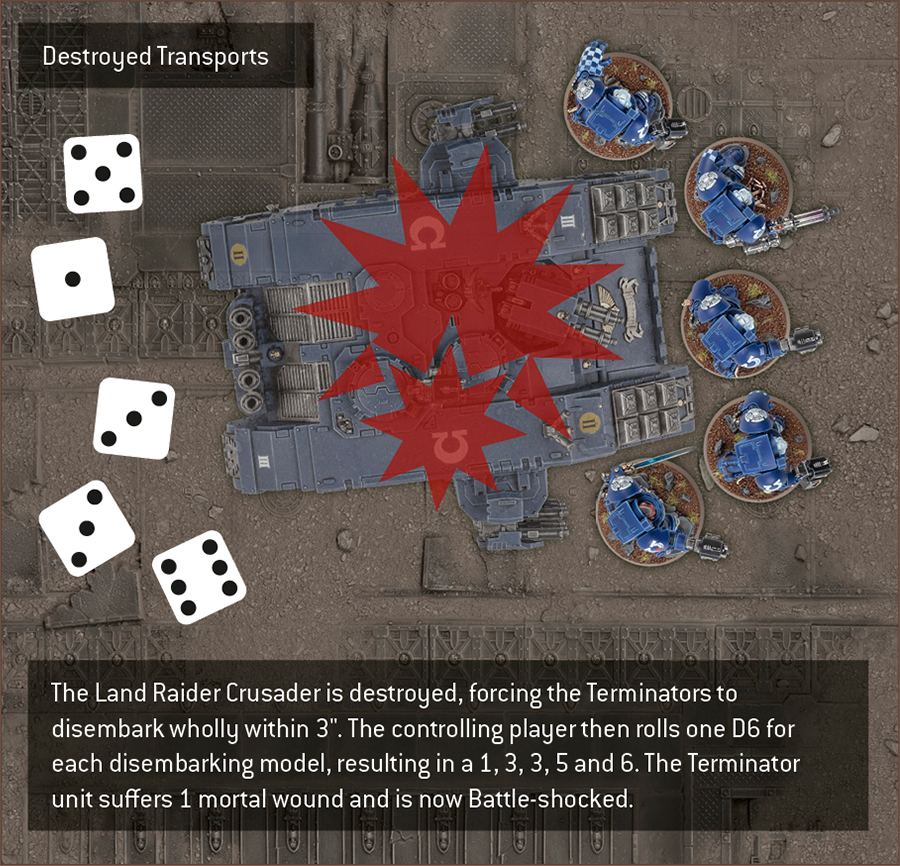
Destroyed Transports
If a TRANSPORT model is destroyed, any units embarked within that TRANSPORT model must immediately disembark (see diagram below) before that TRANSPORT model is removed from the battlefield.
Units that disembark from a destroyed TRANSPORT model are not affected by that model’s Deadly Demise ability (see Shooting Phase section). Instead, you must roll one D6 for each disembarking model. For each roll of 1, that disembarking model’s unit suffers 1 mortal wound (see Shooting Phase section). In addition, if a unit disembarks from a destroyed TRANSPORT model:
■ Until the start of its controlling player’s next Command phase, that unit is Battle-shocked. ■ Until the end of the turn, that unit counts as having made a Normal move this turn, and cannot declare a charge this turn (see Charge Phase section).
Until the start of its controlling player’s next Command phase, the disembarking unit is Battle-shocked.
If a TRANSPORT is destroyed, any embarked units must disembark.
Roll one D6 for each model that disembarks:for each 1, that model’s unit suffers 1 mortal wound.
Until the end of the turn, the disembarking unit counts as having made a Normal move, and cannot declare a charge.
Emergency Disembarkation
If a TRANSPORT model is destroyed and it is not possible to set up a disembarking unit wholly within 3"of that TRANSPORT model and not within Engagement Range of any enemy models, that unit must instead perform an Emergency Disembarkation. This is performed as described for disembarking from a destroyed TRANSPORT model, except that a unit that does so must be set up wholly within 6"of the destroyed TRANSPORT model (instead of wholly within 3") and not within Engagement Range of any enemy models, and when rolling for each disembarking model, that unit suffers 1 mortal wound for each roll of 1-3 (instead of for each roll of 1). If, for any reason, a disembarking model still cannot be set up, that model is destroyed.
Must be set up wholly within 6"of it instead of wholly within 3".
Units disembarking a destroyed TRANSPORT that cannot be set up wholly within 3"of it must perform an Emergency Disembarkation:
Suffer 1 mortal wound for each roll of 1-3, instead of each roll of 1.
Any disembarking model that cannot be set up is destroyed.
Some TRANSPORT models have ‘Firing Deck x’ listed in their abilities. Each time such a model is selected to shoot in the Shooting phase, you can select up to ‘x’ models embarked within it whose units have not already shot this phase. Then, for each of those embarked models, you can select one ranged weapon that embarked model is equipped with (excluding weapons with the [ONE SHOT] ability). Until that TRANSPORT model has resolved all of its attacks, it counts as being equipped with all of the weapons you selected in this way, in addition to its other weapons. Until the end of the phase, those selected models’ units are not eligible to shoot.
Firing Deck ‘x’:Each time this TRANSPORT shoots, select one weapon (excluding weapons with the [ONE SHOT] ability) from up to ‘x’ models embarked within it that have not shot this phase; this TRANSPORT counts as being equipped with those weapons as well. Until the end of the phase, those selected models’ units are not eligible to shoot.